Feeds:
Posts
Comments

Posts Tagged ‘Rice’

Traditional Katsudon

I had never heard of Katsudon before Hubs sent me the link below and asked if we could have this for dinner this week.  It sounded delicious, so of course I said sure!

I learned from Wikipedia that katsudon is a popular Japanese food – a bowl of rice topped with a deep-fried pork cutlet, egg, and condiments.  It has become a modern ritual tradition for Japanese students to eat katsudon the night before taking a major test or school entrance exam. This is because “katsu” is a homophone of the verb katsu, meaning “to win” or “to be victorious”.

Now, I don’t need to be victorious tomorrow, but maybe we’ll win something – note to self: buy a PowerBall ticket.  🙂

The dish was delicious, but I would have liked a few changes.  The original recipe has 2.5T. of sugar, I thought it was to sweet, so I cut it down in the recipe below.  The recipe I used also had you adding the pork to the simmering liquid for 5 minutes.  I think it defeated the purpose of having panko on the outside in the first place – it got kinda soggy.  So, I think keeping the pork out of the liquid will be best.

I will definitely be making this again, but with the changes noted below.

Adapted from wellmaxwell.


INGREDIENTS
2 boneless pork chops, pounded thin
2T. Vegetable oil
1 Yellow onion, sliced in long pieces
Dashi broth (2T. bonito flakes and 1T. dried seaweed steeped in 2C. water)
4T. Soy sauce
4T. Mirin
1.5T. Sugar
2C. Spinach
2 Eggs, beaten used at the end
1 Egg, beaten for breading
Panko crumbs
Salt and pepper

DIRECTIONS
With a meat mallet, pound the pork chops until they are about 1/2″ thin (my local grocery had super-thick chops this week, so I bought one and just cut it in half lengthwise).  Season with salt and pepper on each side.

Ready 3 bowls – one for flour, one for egg and one for panko.  Coat each piece in flour, then place it in egg, then move it to the panko and coat well.

Heat a skillet on medium-high heat with vegetable oil. Place coated pork into the skillet and fry for 2-3 minutes on each side. Remove and place on a plate.  Cover with foil to keep warm.

In a small pot, bring 2 cups of water to boil, place bonito flakes and seaweed into the water and let it boil for 5 mins until the flavors have been released. Strain, and save the broth.

Wash out the skillet previously used for the pork.  Add soy sauce, mirin, 1/2-3/4C. dashi broth and sugar. Add onions, cover and cook over medium heat for 5 mins or until the onions are tender.

Remove the lid and place spinach and egg on top of the sauce.  Cover and cook on medium heat for 3-4 minutes, or until the eggs are done cooking.

Cut the pork chops into slender pieces.

To assemble, place rice in the bottom of your bowl, top with sliced pork and the spinach mixture.  Ladle on extra sauce and enjoy!

Husband Rating – 3.5 out of 5 – “I agree with Bella’s thoughts above and think it’ll be much better next time with the changes she made.”
Read Full Post »

Crunchy Honey Chicken

I’ve been a bad, bad blogger!  I’m SO sorry for the unintentional hiatus.  Ever since Thanksgiving life has been go-go-go and I haven’t had 2 seconds to myself to blog.

That changes today.

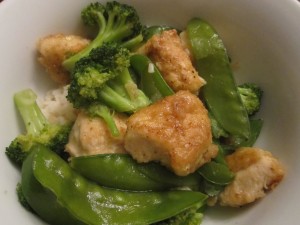
So, today we’re talking chicken.  I’m always looking for a new way to prepare chicken and was so excited when I saw this recipe on How Sweet It Is.  And, it definitely did not disappoint.  The chicken was nice and crunchy, but not too sweet and the veggies were nicely cooked.

Give this a try, I’m sure you won’t be disappointed either.

INGREDIENTS
1lb. Boneless, skinless chicken breast tenders
2 Egg whites
1/3C. Cornstarch (or flour – for dredging)
1C. Broccoli florets
1/2 Red pepper, thinly sliced
3/4C. Sugar snap peas
1 clove garlic, minced
3T. Olive oil
1T. Soy sauce
1/4C. Honey
salt and pepper to taste

DIRECTIONS
Prepare and slice all veggies – feel free to add whatever you would like. In 2 separate bowls, add the egg whites (lightly beaten) and the cornstarch or flour. (The cornstarch will yield a “crispier” chicken). Heat a large skillet over medium-high heat and add 1 tablespoon olive oil. Add veggies with a sprinkle of salt and pepper and saute for about 5 minutes, until softened. Add in soy sauce and garlic and stir so veggies are coated, about 60 seconds. Remove from skillet and set aside in a bowl.

Cut chicken into 1-inch pieces and season with salt and pepper. Heat the same skillet (or you can use a different one, I just use the same to make it easier) over medium-high heat and add remaining olive oil. Dip chicken pieces in egg whites and then lightly dredge in cornstarch. Add to the skillet and let brown for 2-3 minutes, then flip. Continue with remaining chicken pieces, and do so in batches if needed.

Once chicken is cooked, add veggies back in the skillet. Add honey and thoroughly mix to combine. Taste and season with salt, pepper, additional honey or soy sauce. Serve with rice.

Husband Rating – 4 out of 5 – “Delicious!”

Read Full Post »

Last week in school we made 4 different kinds of risotto – saffron, spinach and parmesan, roasted red pepper and butternut squash and sage.  They were all amazing!  So, I decided that tonight I’d make one with two of my favorite ingredients – shrimp and asparagus.  It did not disappoint!

I’ve always been afraid of risotto because I thought it was so hard.  Not so!  The only hard part is standing there stirring almost constantly for 20-30 minutes.  The rest is pretty simple.

This is definitely not a busy weeknight kind of meal, but perfect for weekends and will be great during the winter – it is a very hearty and filling meal.

Recipe from my school textbook “On Cooking”.

INGREDIENTS
3/4lb. Shrimp, peeled and deveined
1lb. Asparagus
6-8C. Chicken or vegetable stock
1 3/4C. Arborio rice
1 large Shallot, diced
2 cloves Garlic
1/4C. White wine
3T. Butter (or Vegan margarine)
1T. Olive oil
1/4C. Parmesan cheese, shredded (I used soy parm, of course)
Salt and pepper to taste

DIRECTIONS
Preheat oven to 400 degrees.

Wash and dry asparagus and lay out on small sheet pan.  Drizzle with olive oil, salt, pepper and granulated garlic.  Roast 10 minutes (might take longer if your asparagus is thick).  Remove and cut into 1″ pieces – set aside.

In a small pot warm the stock and keep over low heat.

In a medium-large pot, warm the olive oil over medium heat.  Add shallot and cook 5-8 minutes until soft and translucent.  Add garlic and cook 2 minutes (be careful not to burn the garlic).

Add the rice to the pot and stir well to combine.  After 2 minutes, add wine and stir until completely absorbed by the rice.

Add the chicken/vegetable stock to the rice, one ladle-full at a time.  Stir each addition until it has almost entirely absorbed, then add another ladle.  The rice will take between 6 and 8 cups of stock and about 20-30 minutes.  Taste occasionally to determine when the rice is done and whether or not another addition is needed.

When you add your last ladle of stock, add the shrimp and butter to the risotto.  It will cook as the last addition of stock absorbs.

After 2-3 minutes, add the asparagus segments and Parmesan cheese.  Stir to combine and taste for seasoning.  Add more salt and/or pepper if necessary.

Husband Rating – 4.5 out of 5 – “Really delicious!”

Read Full Post »

Quick and Easy ‘Paella’

This recipe on Cooking This and That caught my eye while searching through my Google Reader. I had all the ingredients in the house and thought it looked like a delicious, quick meal. I made a few modifications, and it was very tasty!

100_1967

INGREDIENTS:
1 Box Yellow rice
1 1/2T. Olive oil
1 Shallot, chopped
2 Clove garlic, minced
1/2lb. Shrimp, shelled and deveined
1/2lb. chorizo, sliced (I used keilbasa)
2C. Water
1T. Fresh parsley, chopped

DIRECTIONS:

Heat olive oil in deep skillet. Add shallot and garlic. Saute about 2 minutes. Add rice and water. Bring to a boil and turn the heat down to low. Simmer, covered, for 15 minutes.

Add chorizo/keilbasa. Stir and recover for another 8 minutes.

Add shrimp, stir and cook 2-3 minutes (until the shrimp has turned pink and is just cooked).

Add parsley and cook until heated through.

Read Full Post »

Porcupine Meatballs

The other day the hubby and I were walking through our apartment complex and I got a whiff of my childhood.  It smelled exactly like my Mom’s porcupine meatballs.  I knew I had to make these, and soon!  I called Mom and got the recipe.  Man, these things couldn’t be simpler and they’re so darn tasty!

100_1943

INGREDIENTS:
1lb Ground Beef
1/2C Long Grain White Rice
3 Cans Campbells Tomato Soup (I like the low sodium)
Dash of Worcestershire Sauce
Black Pepper to taste

DIRECTIONS:
Mix ground beef, rice and black pepper.  Form into balls and brown in a large skillet.

In a separate bowl combine soup, one and a half cans of water and Worcestershire sauce.

Once the meatballs are browned on all sides (they will not be cooked all the way, that’s ok).  Dump in the soup mix and simmer on low for about a 45 minutes (stirring and flipping the meatballs occasionally) until the meat is fully cooked and the sauce has reduced down by half.

100_1942

Here’s why they’re called porcupine meatballs – as they cook the rice starts to poke out and they look like little porcupines.

Read Full Post »

Chicken Fried Rice

I’ve been craving chicken fried rice for a few days now and decided to see if I could make my own (instead of ordering take out).  I found a great  recipe on Delish.  It’s fabulous…you can basically throw anything and everything you have into this recipe and it’ll work.

Next time I’ll add an extra egg – there wasn’t quite enough egg throughout the rice.  I also completely forgot to make the rice the night before and put it in the fridge…so I had to work with fresh rice.  That made the texture a little more smushy than it should have been with the day old rice.

Otherwise, it was fabulous!

Forgive the photo…my camera wasn’t cooperating tonight.

100_1921

INGREDIENTS:
4C Cold prepared rice, loosened/crumbled
4T Olive Oil
1Lb. Chicken, chopped into bite size pieces
1 Small White Onion
2C Veggies of your Choice (I used carrots, corn, beans and mushrooms)
1t Sriracha Sauce
3-4T Low Sodium Soy Sauce
3/4t Garlic Powder
2 Eggs, beaten
3 Scallions, trimmed and chopped

DIRECTIONS:
In a hot non-stick wok, heat 1 Tbsp oil. Over medium-high heat, add onions and veggies and saute until softened.  Add chicken and cook until mostly done (will still be a little pink the middle).  This way, you don’t overcook the chicken.

Add Siracha sauce to season veggies. Add crumbled rice and drizzle with remaining oil and soy sauce. Add garlic powder.

Stir rice until even in color and all rice has soy sauce on it. Stir occasionally, while allowing rice to warm up.

Make a well in the middle of your wok and pour in beaten eggs, scrambling the eggs while incorporating more and more rice.

Add chopped green onions. Continue to heat rice until egg is fully cooked.

Season with salt & pepper as desired.

Read Full Post »

Red Rice and Chicken

Hubby found this recipe somewhere online and emailed it to me the other day asking if we could try it.  Sure!  I’ll try anything once.  I was afraid the chicken was going to be dry, but it was actually quite moist.  It’s definitely not a quick-fix weeknight meal, but is good when you have a little time to spare.  Enjoy!

11020818141

INGREDIENTS
1/4 cup vegetable oil
2 medium white onions (2 cups chopped)
4-5 chicken breasts
2 cups basmati rice
6 oz can tomato paste
3 cups water
1/2t. turmeric powder
1/2t. pepper
1/2t. salt

DIRECTIONS
Dice onions and set aside.  Cut chicken (I used tenders) into bite size pieces and lightly season with salt and pepper.

With burners on med-high, add the chicken into a good-size pot with a few T of oil (make sure the pot you use has a good lid).   Lightly cook the outside of the chicken (the inside will be almost completely raw).  Remove from pan and cover to keep warm.

Next, add the oil and onions to the pot and brown evenly.  After 10 minutes or so, add the tomato paste, water and spices.  Stir to combine (I find a whisk works very well to break up the paste).

Now add the rice and mix.  Burners on med-high. Keep mixing at a fast pace. You will notice the rice wants to stick to the bottom of the pot. Keep mixing to avoid this. If the mixture is bubbling so much that its jumping out the pot lower the temp.

The mixture will thicken. When the steam bubbles are having a hard time pushing through the mixture and the surface kinda undulates turn the burner to low. Keep mixing until there are no more bubbles pushing through. The rice should be halfway cooked.

Dump the chicken on the top of the rice mixture.  You are going to want to stir it in, but don’t!  Resist the temptation.

Put the lid on and leave it for 1.5 hours. Don’t lift the lid!

Read Full Post »

Cajun Shrimp and Rice

I came across this recipe while perusing my Cooking Light Cookbook.  It looked simple enough, and we had some shrimp to use up, so I figured we’d give it a try.  Overall it was good.  I’d like to try it again with the tomatoes (I didn’t have any in the cupboards and wasn’t going to run to the store for one can of tomatoes) as it was a tad dry.

INGREDIENTS
1  (3 1/2-ounce) bag boil-in-bag long-grain rice
2  tablespoons  olive oil, divided
2  pounds  peeled and deveined large shrimp
1  tablespoon  Cajun seasoning, salt-free
1  tablespoon  bottled minced garlic (I used two whole cloves)
1  cup  frozen bell pepper stir-fry, thawed (I chopped up leftover bell peppers I had in the fridge) 
1/4  cup  chopped green onions
1/4  teaspoon  dried thyme
1/2  cup  canned Italian-style stewed tomatoes, undrained
1/2  teaspoon  salt
1/8  teaspoon  black pepper

DIRECTIONS
Cook rice according to package directions, omitting salt and fat.

While the rice cooks, heat 1 tablespoon oil in a large nonstick skillet over medium-high heat. Sprinkle the shrimp with Cajun seasoning; toss to coat. Add shrimp to pan; sauté 4 minutes or until done. Remove from pan; keep warm.

Heat 1 tablespoon oil in pan over medium-high heat. Add garlic; sauté 30 seconds. Add the pepper stir-fry, green onions, and thyme; sauté 3 minutes or until tender. Stir in cooked rice, shrimp, tomatoes, salt, and pepper, and cook 1 minute or until thoroughly heated.

Read Full Post »

Bourbon Chicken

Wow! I have to say, I had my reservations about this recipe, because I really don’t like soy sauce. But, man, it was SO good! It tasted just like the bourbon chicken you get in the mall food court (but I’m sure this is much better for you). Source – Amber’s Delectable Delights


INGREDIENTS
2 lbs Boneless Chicken Breasts, cut into bite size pieces
2T Olive Oil

1 Garlic Clove
, crushed
1/4t
Ginger (I used 1/2t)
3/4t C
rushed Red Pepper Flakes (I used 1/2t)
1/4C Apple Juice
1/3C L
ight Brown Sugar
2T
Ketchup
1T
Cider Vinegar
1/2C W
ater
1/3C
Soy Sauce
1T Corn Starch

DIRECTIONS
Heat oil in a large skillet. Add chicken pieces and cook until lightly browned. Remove chicken and set aside.

Add remaining ingredients (mixing corn starch with water before adding to skillet), heating over medium heat until well mixed and dissolved.

Return chicken and bring to a boil. Reduce heat and simmer for 20 minutes.

Serve over hot rice and ENJOY.

Read Full Post »