Feeds:
Posts
Comments

Posts Tagged ‘Chocolate’

Recently, I got a gig baking mini cheesecakes for a local restaurant’s Sunday brunch buffet.  It’s pretty awesome!

I was given the freedom to make whatever flavor combinations I want with the cheesecakes.  I’ve done pear/caramel, blackberry (which you may remember from an earlier post), triple chocolate, strawberry, pineapple and chocolate mint so far.

This week I decided to go with a personal favorite – chocolate and peanut butter.  Holy yum, Batman!!  These smelled amazing!  I sure hope the restaurant patrons loved them!


INGREDIENTS
For the crust:
1 1/2C. Oreo cookies
4T. Melted butter

For the filling:
2lbs. Cream cheese – at room temp.
1 1/2C. Sugar
4 Eggs – at room temp.
1/3C. Creamy peanut butter
Pinch of salt
1t. Vanilla extract

DIRECTIONS
Preheat the oven to 325.  Line 2 cupcake pans with paper liners.

In your food processor pulse Oreos until finely ground.  Add melted butter and stir together with a fork until well blended.  Press 1T. of the mixture into the bottom of each cupcake liner and press lightly with the bottom of a small glass.  Bake until just set, 5 minutes.  Transfer to a cooling rack.

To make the cheesecake, beat the cream cheese on medium-high speed in the bowl of an electric mixer until fluffy.  Blend in the sugar until smooth.  Mix in the salt and vanilla.  Beat in the eggs one at a time, mixing well after each addition.  Lastly, add the warmed peanut butter.

To assemble, spoon 3 tablespoons of the cheesecake batter over the crust in each cupcake liner.

Bake until the filling is set, rotating the pans halfway through baking, about 22 minutes.  (They will look quite puffed initially but will return to normal quickly.)  Transfer to a wire cooling rack and let cool to room temperature.

Drizzle with more warmed peanut butter and 1oz. bittersweet chocolate.

Transfer to the refrigerator and let chill for at least 4 hours before serving.

Read Full Post »

Coffee and Donuts Cake

This weekend we celebrated my wonderful sister’s 29th birthday – and of course I was commissioned to make a cake.

The birthday meal was supposed to be a brunch (which was later changed, and I wasn’t informed…but that’s another matter) and I figured this coffee and donuts cake would make the perfect finish to a birthday brunch.  Even though the meal changed, the dessert was still just as awesome!  Absolutely delicious!

I didn’t have time this week to make the donuts by hand, so I bought plain chocolate ones and drizzled them with melted semi-sweet chocolate and topped them with birthday sprinkles.

For the cake, I used this chocolate cake recipe – it’s my favorite and is SOOOO good!

The coffee swiss buttercream recipe is from Sprinkles Bakes.  Check her blog out if you want to see the donut recipe.  Even if you don’t want the donut recipe, you should check her out anyway…Sprinkles Bakes is a very cute blog!


INGREDIENTS
Coffee Buttercream
1C. Sugar
1/3C. Water
1t. Vanilla extract
2 Large eggs
3 Sticks unsalted butter, softened (or vegan margarine if you’re going dairy-free)
2T. Instant espresso powder dissolved in 1T. hot water

DIRECTIONS
In a small heavy saucepan set over medium heat, dissolve the sugar in the water.  Bring the mixture to a boil, stirring constantly.  Continue to cook until it registers 240°F on a candy thermometer.

In the bowl of a stand mixer with the whisk attachment, beat the eggs until they are frothy.  While mixer is running, add the sugar syrup in a thin stream, carefully tempering the syrup into the eggs without cooking them.  Beat until it is cool. Change to the paddle attachment and add the softened butter, 1 tablespoon at a time.  Add the espresso mixture, and beat until it is light and fluffy.

After the cake cools completely, frost with buttercream and decorate with chocolate donuts.  Enjoy!

HAPPY BIRTHDAY SEEEESTER!!

Husband Rating – 4.5 out of 5 – “Delicious!  I loved every bit of this cake!”

Read Full Post »

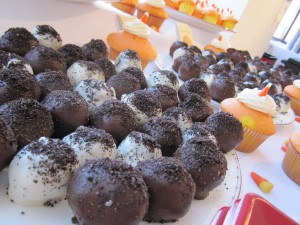
Oreo Truffles

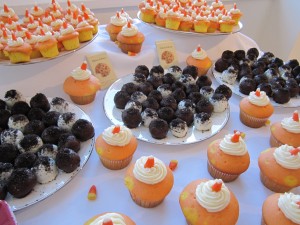
This weekend I had my first paying ‘gig’!  I was asked to make treats for my sister’s mother-in-law’s poetry reading and art show.  I didn’t have a whole lot of time to cook, with school and all, but really wanted to impress.

So, I decided to make Oreo truffles and some candy corn cupcakes.

Everything was a big hit – but I think the truffles really got everyone at the art show talking!  If only they knew how simple they were to make!  Shhhhh!  Don’t tell.

Oh, if you are curious – the candy corn cupcakes are just your basic white cake mix, divided into two bowls and dyed yellow and orange.  Then, after baking, top with white vanilla buttercream.  Top with a candy corn.


INGREDIENTS
1 Package Oreo cookies
1 Can sweetened condensed milk
Chocolate for dipping – white, milk, dark – whatever you like.

DIRECTIONS
Pulverize Oreos in food processor until they are fine crumbs and no chunks remain.  Reserve 1/4C. of crumbs for topping the finished truffles, if you want.  Next, add condensed milk and combine thoroughly.

Form into balls – I used a 35mm scoop.  This gave me about 35 balls.  Of course, you can make them smaller or larger.

Place newly formed balls on baking sheet and place in freezer for a few minutes to set.  While they are cooling, start your chocolate melting over a double-boiler.

Remove truffles from freezer and ready two toothpicks.  Poke one ball and dip in chocolate.  Allow excess to drizzle off before placing on parchment paper to dry.  Using the toothpicks will help get nice smooth sides (2nd toothpick is to help get the first one off.)  Sprinkle reserved crumbs over the top before starting the next truffle – they won’t stick if the chocolate dries first.

Refrigerate when finished.  Consume.  Enjoy!

Read Full Post »

Are you drooling over the title of this cake alone?  I know I was when I came across it on Annie’s Eats.  I was just waiting for the perfect occasion to make such a decadent cake.

The other day my sister called and asked me to whip something up for a charity auction – the cake will be auctioned off and money given to charity – and I knew this would be perfect!  I hope it brings in a lot of … dough (**snicker, snicker** I’m such a baking dork).


INGREDIENTS
For the brownie cake:
1C. All-purpose flour
1t. Baking soda
1/4t. Salt
8T. Unsalted butter, cut into 8 pieces
5oz. Bittersweet chocolate, coarsely chopped
3 Large eggs
1/2C. Light brown sugar, packed
1/4C. Sugar
3T. Light corn syrup
1/2t. Vanilla extract

For the topping:
2C. Sugar
1/2C. Water
1 1/2T. Light corn syrup
2/3C. Heavy cream
2T. Unsalted butter, at room temperature
1C. Honey roasted peanuts

DIRECTIONS
Center a rack in the oven and preheat the oven to 350° F.  Butter an 8-inch springform pan, dust the inside with flour, tap out the excess and line the bottom of the pan with a piece of parchment paper.  Place the springform pan on a baking sheet.

To make the cake, combine the flour, baking soda and salt in a small bowl; whisk together and set aside.

Add the butter and chocolate to a microwave safe bowl and heat in 30 second intervals, stirring in between, until melted.

In a large mixing bowl, whisk together the eggs and sugars until well blended.  Whisk in the corn syrup, followed by the vanilla.  Add in the melted butter and chocolate mixture, and whisk until combined.  Gently whisk in the dry ingredients, mixing only until they are just incorporated.  The batter should be thick, smooth and shiny.  Pour the batter into the prepared pan and jiggle the pan a bit to even out the batter.

Bake for 40-45 minutes or until a thin knife inserted in the center comes out almost clean.  Transfer the pan to a rack and cool for 15 minutes, then run a thin knife between the cake and the pan and carefully remove the sides of the springform.  The cake may have puffed up during baking, but don’t be concerned if it develops a crater in the center while cooling.  Allow to cool to room temperature.  When the cake is totally cool, invert it, remove the base of the pan and peel off the parchment paper.  Turn the cake right side up onto a serving platter.

To make the topping, combine the sugar, water and corn syrup in a medium heavy-bottomed saucepan, stirring just to combine the ingredients.  Place the pan over medium-high heat.  Heat, without stirring, until the caramel turns deep amber, 5 to 10 minutes depending on the size of your saucepan and the intensity of the heat (mine actually took closer to 15 minutes).

Lower the heat a bit and, standing back from the saucepan, add the cream and butter.  When the spatters are less vehement, stir to calm down the caramel and dissolve any lumps.  Stir in the peanuts and pour mixture into a heatproof bowl.

You will have more caramel than you need, but you want to get all of the peanuts onto the cake, so spoon all of the peanuts out of the hot caramel and onto the top of the cake.   Pour or spoon enough caramel to cover all the nuts, drizzling a bit over the edges of the cake for presentation.  Allow the topping to set at room temperature, about 20 minutes, before serving.  Keep the leftover caramel at room temperature and save for another use.  (I used a 10″ springform pan – well, because that’s all I have – and had just enough caramel to cover).

Read Full Post »

Yesterday was my wonderful husband’s 29th birthday (Happy Birthday Homey!).  For his birthday dessert he requested a chocolate cake with chocolate frosting and coconut.

I’ve heard wonderful things about the Hershey’s Perfectly Chocolate Cake and Frosting recipe but haven’t had the chance to try it until now.  I’m so glad I did…it’s amazing!  Super-chocolatey and pretty simple.

The coconut is my addition – so feel free to leave it out if you don’t like or don’t want coconut in your cake.

My only suggestion would be to make one and a half batches of frosting.  One wasn’t enough to put in between the layers and cover the cake completely, but I didn’t end up using the whole second batch.  One and a half would be perfect.


INGREDIENTS
Cake
2C. Sugar
1 3/4C. All-purpose flour
3/4C. Hershey’s Cocoa
1 1/2t. Baking powder
1 1/2t. Baking soda
1t. Salt
2 Eggs
1C. Milk
1/2C. Vegetable oil
2t. Vanilla extract
1C. Boiling water

Frosting
1/2C. Butter or margarine
2/3C. Hershey’s Cocoa
3C. Powdered sugar
1/3C. Milk
1t. Vanilla extract

DIRECTIONS
For the cake
Heat oven to 350°F.  Grease and flour two 9-inch round baking pans.

Stir together sugar, flour, cocoa, baking powder, baking soda and salt in large bowl.  Add eggs, milk, oil and vanilla; beat on medium speed of mixer 2 minutes.  Stir in boiling water (batter will be thin).  Pour batter into prepared pans.

Bake 30 to 35 minutes or until wooden pick inserted in center comes out clean.  Cool 10 minutes; remove from pans to wire racks.  Cool completely.

For the frosting
Melt butter.  Stir in cocoa.  Alternately add powdered sugar and milk, beating to spreading consistency.  Add small amount additional milk, if needed.  Stir in vanilla.

To assemble
Place one layer of cake on a plate.  Top with a layer of frosting.  Sprinkle coconut on top.  Hold other layer in your hand (I put saran wrap in between my hand and the cake so it didn’t stick) and frost the bottom.  Gently stack on top of the first layer.  Frost entire cake with remaining frosting.  Over the sink or a large cutting board (for easy clean up) tap extra coconut onto the sides of the cake for decoration.  Keep in refrigerator until ready to serve.


Husband Rating – 5 out of 5 – “The best cake my wife has ever made!”

Read Full Post »

Nutella Brownies

This year, for Mother’s Day (since my Mother-in-Law was busy) we opted to have lunch with my family at my sister’s Mother-in-Law’s house.  Did you follow that?  Ok, good.

I was asked to bring dessert.  So, I decided to make two treats.  These Nutella brownies and a Lemon cheesecake cheese ball.

For those that might have been living under a rock – Nutella is a wonderfully delicious chocolate hazelnut spread that goes on … well … just about anything.  If you’ve never tried it, run to the store now and get a jar.  This recipe will be waiting for you when you get back.  Seriously, go now!

These brownies were amazing, if I do say so myself!  I just added the Nutella and some toasted hazelnuts to my regular brownie recipe (that I found on AllRecipes a while back and have been using ever since).

You should definitely try these!

INGREDIENTS
4 (1 ounce) squares Unsweetened chocolate
3/4C. Butter
2C. Sugar
3 Eggs
1t. Vanilla extract
1C. All-purpose flour
1/2C. Hazelnuts (toasted, please)
1/2C. Nutella (divided)

DIRECTIONS
Preheat oven to 350 degrees.

Microwave chocolate and butter in large bowl at HIGH for 2 minutes or until butter is melted.

Stir until chocolate is melted.  Stir in sugar.  Mix in eggs and vanilla.  Stir in flour 1/4C. warmed Nutella and nuts.

Spread in greased 13 x 9 inch pan.  Drizzle remaining 1/4C. warmed Nutella over top of the brownies.

Bake for 35 minutes (or until a toothpick inserted comes out mostly clean).

Husband Rating – 3.5 out of 5 – “I don’t normally like nuts getting in the way of my chocolate brownies…but these were good!”

Read Full Post »

Chocolate Flower Lollipops

This year I was asked to serve on the auction committee at our old high school – yes, Christopher and I are high school sweethearts.  Of course I accepted (the way I see it – I’m in no position to give money, but time is something I have…so I volunteer there whenever I can).

Anyway, throughout the course of the meetings it came out that I had a blog.  Therefore, I should be in charge of the food committee!  And of course I accepted!  We, as a food committee, decided that it would be cheaper to make our own desserts.  One woman offered cookies, another mini cupcakes and another truffles.

I tried to make Bakerella’s apple cake pops and it was a total disaster.  I’m not even going to post those pictures – they’re just too bad.  So, after panicking for a day or so (because I didn’t have a plan B) the Hubby saved the day.  Knowing that I had an abundance of candy melts he went to the local bakery supply store and got me some flower molds and more sticks.  What a sweetheart!

So, I spent the next 4 nights making over 300 chocolate flower lollipops.  The process is quite simple, but the melting and waiting for things to set is what takes the longest.

(Here I am, at the Auction, with my Nephew and the completed lollipop garden)

INGREDIENTS
Candy melts in assorted colors
Plastic molds – in shape of your choice
Lollipop sticks
Patience

DIRECTIONS
Wash molds well and dry thoroughly.

Melt candy in a double boiler or in the microwave until smooth (if using the microwave, go in short 20 sec. increments – you don’t want it to burn).

Gently spoon candy into molds.  Give them a quick tap to let it settle, insert the stick and top with a little more candy.

When all of your molds are full, place tray in the freezer for 7-10 minutes.

Gently pull on stick to get the candy to release, set aside, start over.

Read Full Post »

Last week, while we were away, one of our best friends celebrated his 30th birthday.  Happy Birthday Brian!

We made sure to have a little belated celebration last night and I wanted to make two of his favorites – Mexican food and something containing chocolate and peanut butter.

So, I whipped up some of the amazing chicken enchiladas I posted about last month and went searching for a dessert that was sure to knock his socks off.  I found this recipe on the King Arthur Flour website.  It was pretty easy to make and tasted amazing!  I will definitely be making this again in the future!

INGREDIENTS
Cake
1C. Granulated sugar
1C. Unbleached All-Purpose Flour
1T. Cornstarch
1/3C. Double-Dutch Dark Cocoa, black cocoa, or Dutch-process cocoa
1t. Baking powder
1t. Espresso powder
1/4t. Baking soda
1/2t. Salt
2 Large eggs
1/3C. Vegetable oil
1t. Vanilla extract
1/2C. + 2T. Water

Filling
3/4C. Peanut butter, creamy or chunky
2C. Confectioners’ sugar or glazing sugar
1t. Vanilla extract
1/3C. Milk or cream

Icing
1C. Semisweet or bittersweet chocolate, chopped
6T. Heavy or whipping cream
1/2C. Chopped salted peanuts, for garnish (optional)

DIRECTIONS
Preheat the oven to 350 degrees.  Lightly grease and flour (or grease, then line with parchment, then grease again) an 8″ round cake pan.  Note: This pan needs to be at least 2″ tall; if you have a non-standard, shorter 8″ pan, substitute a 9″ round pan.

To make the cake: Whisk together the dry ingredients.  Add the eggs, oil, and vanilla, beating until smooth.  Gradually add the water, beating until smooth.  Pour the batter into the prepared pan.

Bake the cake for 35 to 38 minutes (about 25 minutes if you’re using a 9″ pan), or until a cake tester inserted into the center comes out clean.  Cool the cake in the pan for 15 minutes, then turn it out of the pan to cool completely on a rack.

To make the filling: Beat together the peanut butter, sugar, and vanilla till crumbly, then add the milk or cream, beating till smooth.  Add additional milk or cream, if necessary, to make a spreadable filling (I needed to add about 3T. more).

To make the icing: Combine the chocolate and cream in a microwave-safe bowl, and heat until the cream is hot, and the chocolate soft.  Stir to melt the chocolate completely, reheating very briefly if necessary.  Allow the icing to rest for about 30 to 45 minutes, or until it’s thickened enough to be spreadable.

To assemble the cake: Slice the cake in half horizontally, to make two layers.  Place one piece, cut side up, on a serving plate.  Spread with the filling.  Top with the second piece, cut side down.  Spread the top and sides of the cake with the icing.  Garnish with chopped peanuts, if desired.

Husband Rating – 4 out of 5 – “I had to avoid the peanut butter layer b/c of the dairy, but the cake was great!  Super moist!”

Read Full Post »

Flourless Chocolate Cake

Ever since my co-worker, Meher, brought this cake to a work function a few months ago I’ve been wanting to make it at home.  She was nice enough to bring the recipe in for me last week so I got right to work.

This cake is very easy to put together (I already had all of the ingredients on hand)…and the taste, oh my goodness is it good!  Super fudgy and deliciously chocolatey.

Christopher was very excited to try this because he hasn’t had anything resembling a cheesecake in a long time and this was rich enough to fill that void well.

INGREDIENTS
1C. Sugar
10oz. Semi-sweet chocolate, chips or cut up from a bar
2 1oz. Squares unsweetened chocolate, cut up
2 Sticks butter
5 Eggs
1/3C. Water

DIRECTIONS
Preheat oven to 350F.

Combine 3/4C. sugar with water in a large bowl.  Microwave on high – 1 to 2 minutes or until boiling.

Stir in both chocolates and butter until well blended (I needed to re-microwave for about 30 seconds to get everything to melt completely).

In another bowl, beat eggs and remaining 1/4C. sugar with electric mixer on high until almost doubled in volume (3-4 minutes).

Stir egg mixture into chocolate and mix until well combined.

Pour into greased 9″ springform pan.  Set springform pan into a large rectangle baking dish.  add enough water to the baking dish to reach 1″ up on the side of the pan.

Bake 40-45 minutes (mine took the full 45 minutes) or until cake is set.  Let cool and refrigerate at least 6 hours, or overnight if possible.  Enjoy!

Husband Rating – 4.5 out of 5 – “I love chocolate, this is awesome!”

Read Full Post »

Chocolate Chip Cookie Dough Dip

We had some friends over last night to watch the Superbowl.  This was one of the many sweet treats we had at our party (but the only one I can take credit for).  It was ridiculously good!  Everyone just loved it…don’t tell them, but I even used fat-free cream cheese!  There was almost nothing left at the end of the night.

From RecipeZaar

INGREDIENTS
1/2C. Butter
1/3C. Brown sugar
1t. Vanilla extract
1 (8 ounce package) Cream cheese, softened
1/2C. Confectioners’ sugar
3/4C. Semi-sweet mini chocolate chips
1/2C. Chopped nuts (optional)
Nilla wafers and/or Graham crackers sticks for dipping

DIRECTIONS
In a small saucepan, melt the butter with the brown sugar over medium heat.  Stir continuously, until the brown sugar dissolves.

Remove from heat, whisk in the vanilla and set aside to cool.

Beat the cream cheese and confectioner’s sugar for 1 minute.  Slowly beat in the cooled butter mixture and beat again for another minute.

Stir in the chocolate chips and nuts, if using.  Pour into a serving bowl and refrigerate.

Garnish with additional chocolate chips or nuts, if you choose.

Husband Rating – N/A – “This isn’t a Christopher-friendly recipe, but everyone else sure loved it.”

Read Full Post »

Older Posts »