Feeds:
Posts
Comments

Archive for the ‘Desserts’ Category

Desserts and Wine

Today, I had the opportunity to attend a hobby class at school that focused on pairing desserts with wine.  We made a bunch of wonderful desserts and discussed the kinds of wines that would go well with each (many came from the DiGrazia Vineyard in Brookfield, CT) … then, of course, we did a tasting.

I’m so glad I took time out of my Saturday to attend, I learned so much!

I’m certainly no sommelier (some of these wines really tasted like feet) but, if I had to give one piece of advice it would be this – whenever pairing wine with dessert you always want the wine to be as sweet or sweeter than the dish you are serving.  Easy as that.

Below are pics as well as a short description of each dish and wine pairing.  I hope you enjoy!

Flourless chocolate cake with raspberries and raspberry coulis
paired with
Brachetto d’Acqui rose – a lovely sparkling wine from the Italian Piedmont near Asti

Capuccino creme brulee with candied hazelnuts and hazelnut wafers
paired with
Malmsey Madeira – full-bodied, wonderfully rich with a hint of chocolate that pairs well with coffee

Pear frangipane tartlet
paired with
Yankee Frost – A sweet Vidal Blanc, an ice wine (the grapes are left on the vine until after the first frost)

Bosc pear, gorgonzola dulce and hazelnut wafers
paired with
Blacksmith Port – a hybrid St. Croix grape with added grain alcohol

Panna cotta with apricot compote
paired with
Quady Essencia – an orange, apricot and almond flavored muscat grape from California

Almond biscotti and chocolate truffles
paired with
Harvest Spice – a blush wine with flavors of pumpkin and spices


Oh, and just in case you were wondering…the Yankee Frost, Brachetto d’Acqui and Quady Essencia were my favorites.

Read Full Post »

Recently, I got a gig baking mini cheesecakes for a local restaurant’s Sunday brunch buffet.  It’s pretty awesome!

I was given the freedom to make whatever flavor combinations I want with the cheesecakes.  I’ve done pear/caramel, blackberry (which you may remember from an earlier post), triple chocolate, strawberry, pineapple and chocolate mint so far.

This week I decided to go with a personal favorite – chocolate and peanut butter.  Holy yum, Batman!!  These smelled amazing!  I sure hope the restaurant patrons loved them!


INGREDIENTS
For the crust:
1 1/2C. Oreo cookies
4T. Melted butter

For the filling:
2lbs. Cream cheese – at room temp.
1 1/2C. Sugar
4 Eggs – at room temp.
1/3C. Creamy peanut butter
Pinch of salt
1t. Vanilla extract

DIRECTIONS
Preheat the oven to 325.  Line 2 cupcake pans with paper liners.

In your food processor pulse Oreos until finely ground.  Add melted butter and stir together with a fork until well blended.  Press 1T. of the mixture into the bottom of each cupcake liner and press lightly with the bottom of a small glass.  Bake until just set, 5 minutes.  Transfer to a cooling rack.

To make the cheesecake, beat the cream cheese on medium-high speed in the bowl of an electric mixer until fluffy.  Blend in the sugar until smooth.  Mix in the salt and vanilla.  Beat in the eggs one at a time, mixing well after each addition.  Lastly, add the warmed peanut butter.

To assemble, spoon 3 tablespoons of the cheesecake batter over the crust in each cupcake liner.

Bake until the filling is set, rotating the pans halfway through baking, about 22 minutes.  (They will look quite puffed initially but will return to normal quickly.)  Transfer to a wire cooling rack and let cool to room temperature.

Drizzle with more warmed peanut butter and 1oz. bittersweet chocolate.

Transfer to the refrigerator and let chill for at least 4 hours before serving.

Read Full Post »

Toy Story Cake

This is a special cake for a special little boy.  My nephew, PJ, turned 2 years old this week!

The theme of the little guy’s birthday party was Toy Story.  PJ is a big fan of Buzz Lightyear and I hope this cake really helped to make his birthday party perfect!

Now, Wilton has a cake pan with Buzz on it.  I don’t know about you, but I’ve never had a whole lot of luck with those figure pans looking the way they should.  So, I figured that to ensure that this would look good, I should make a layer cake and put the little figures around it.

In order to make the most people happy, I went with a vanilla cake with plain vanilla buttercream (you can find both recipes here).  Simple, but so good!  On top is a single chocolate chip cupcake – just for the birthday boy – complete with Buzz and candles.

Special thanks to my awesome hubby for helping with the army men decorations (I promise not to tell the birthday boy that you kept a few).  LOL!

Read Full Post »

Back in August I stumbled upon Beantown Baker’s post about making homemade vanilla extract and decided that I just HAD to give these as Christmas gifts to all of the special ladies in my life this year.

So, I ordered the bottles, secured the beans, bought the vodka and got right to work.

The extract is so simple and pretty much does all the work itself!

INGREDIENTS
Vanilla beans – 2 per jar
Vodka

DIRECTIONS
Wash and dry bottles well.

Add one or two beans to each jar and fill with vodka.

Close tightly and store in a box somewhere cool and dark (I used a corner of our basement).

Every week or so, take the bottles out and give them a good shake.

Your extract will be ready in about 2 months, but the longer you let it sit the better!

Husband Rating – 5 out of 5 – “Brilliant idea!  I had fun shaking these – LoL!”

Read Full Post »

Coffee and Donuts Cake

This weekend we celebrated my wonderful sister’s 29th birthday – and of course I was commissioned to make a cake.

The birthday meal was supposed to be a brunch (which was later changed, and I wasn’t informed…but that’s another matter) and I figured this coffee and donuts cake would make the perfect finish to a birthday brunch.  Even though the meal changed, the dessert was still just as awesome!  Absolutely delicious!

I didn’t have time this week to make the donuts by hand, so I bought plain chocolate ones and drizzled them with melted semi-sweet chocolate and topped them with birthday sprinkles.

For the cake, I used this chocolate cake recipe – it’s my favorite and is SOOOO good!

The coffee swiss buttercream recipe is from Sprinkles Bakes.  Check her blog out if you want to see the donut recipe.  Even if you don’t want the donut recipe, you should check her out anyway…Sprinkles Bakes is a very cute blog!


INGREDIENTS
Coffee Buttercream
1C. Sugar
1/3C. Water
1t. Vanilla extract
2 Large eggs
3 Sticks unsalted butter, softened (or vegan margarine if you’re going dairy-free)
2T. Instant espresso powder dissolved in 1T. hot water

DIRECTIONS
In a small heavy saucepan set over medium heat, dissolve the sugar in the water.  Bring the mixture to a boil, stirring constantly.  Continue to cook until it registers 240°F on a candy thermometer.

In the bowl of a stand mixer with the whisk attachment, beat the eggs until they are frothy.  While mixer is running, add the sugar syrup in a thin stream, carefully tempering the syrup into the eggs without cooking them.  Beat until it is cool. Change to the paddle attachment and add the softened butter, 1 tablespoon at a time.  Add the espresso mixture, and beat until it is light and fluffy.

After the cake cools completely, frost with buttercream and decorate with chocolate donuts.  Enjoy!

HAPPY BIRTHDAY SEEEESTER!!

Husband Rating – 4.5 out of 5 – “Delicious!  I loved every bit of this cake!”

Read Full Post »

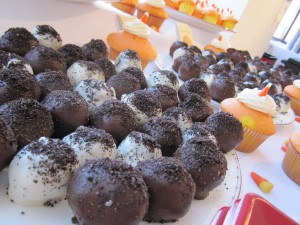
Oreo Truffles

This weekend I had my first paying ‘gig’!  I was asked to make treats for my sister’s mother-in-law’s poetry reading and art show.  I didn’t have a whole lot of time to cook, with school and all, but really wanted to impress.

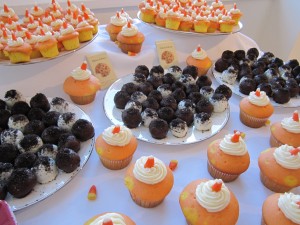
So, I decided to make Oreo truffles and some candy corn cupcakes.

Everything was a big hit – but I think the truffles really got everyone at the art show talking!  If only they knew how simple they were to make!  Shhhhh!  Don’t tell.

Oh, if you are curious – the candy corn cupcakes are just your basic white cake mix, divided into two bowls and dyed yellow and orange.  Then, after baking, top with white vanilla buttercream.  Top with a candy corn.


INGREDIENTS
1 Package Oreo cookies
1 Can sweetened condensed milk
Chocolate for dipping – white, milk, dark – whatever you like.

DIRECTIONS
Pulverize Oreos in food processor until they are fine crumbs and no chunks remain.  Reserve 1/4C. of crumbs for topping the finished truffles, if you want.  Next, add condensed milk and combine thoroughly.

Form into balls – I used a 35mm scoop.  This gave me about 35 balls.  Of course, you can make them smaller or larger.

Place newly formed balls on baking sheet and place in freezer for a few minutes to set.  While they are cooling, start your chocolate melting over a double-boiler.

Remove truffles from freezer and ready two toothpicks.  Poke one ball and dip in chocolate.  Allow excess to drizzle off before placing on parchment paper to dry.  Using the toothpicks will help get nice smooth sides (2nd toothpick is to help get the first one off.)  Sprinkle reserved crumbs over the top before starting the next truffle – they won’t stick if the chocolate dries first.

Refrigerate when finished.  Consume.  Enjoy!

Read Full Post »

Peanut Butter Cup Cookies

I was looking around for a treat to take to a work meeting yesterday and noticed the abundance of Halloween candy just sitting there, staring at me, waiting to be eaten.  So, I decided to make cookies out of some of the peanut butter cups.

These are awesome!  I was able to use up a bunch of the chocolate remnants taking up space in my baking cabinet and I already had all of the ingredients on hand.  I love when that happens!

Recipe loosely adapted from:  AllRecipes

INGREDIENTS
1C. Butter, softened
3/4C. Creamy peanut butter
3/4C. Packed brown sugar
1/2C. White sugar
2 Eggs
1t. Vanilla extract
2 1/3C. All-purpose flour
1t. Baking soda
3/4C. Chocolate Chips – bittersweet, semi-sweet, milk…whatever you like or have on hand is fine (I used a combo of all 3)
10-15 Peanut butter cup candies – cut into small pieces

DIRECTIONS
Preheat oven to 350 degrees.

Cream butter, peanut butter and sugars until smooth.  One at a time, beat in eggs.  Then stir in vanilla.

Combine flour and baking soda in a separate container, pour into butter mixture all at once and mix until the cookie just comes together.

If using a stand mixer, remove bowl and mix in chocolate chips by hand.

Drop by rounded tablespoonfuls onto ungreased cookie sheets.

Bake 9-11 minutes.  Let cool for 2 minutes before moving to a cookie sheet.

Husband Rating – 4 out of 5 – “A delicious Halloween treat!”

Read Full Post »

Are you drooling over the title of this cake alone?  I know I was when I came across it on Annie’s Eats.  I was just waiting for the perfect occasion to make such a decadent cake.

The other day my sister called and asked me to whip something up for a charity auction – the cake will be auctioned off and money given to charity – and I knew this would be perfect!  I hope it brings in a lot of … dough (**snicker, snicker** I’m such a baking dork).


INGREDIENTS
For the brownie cake:
1C. All-purpose flour
1t. Baking soda
1/4t. Salt
8T. Unsalted butter, cut into 8 pieces
5oz. Bittersweet chocolate, coarsely chopped
3 Large eggs
1/2C. Light brown sugar, packed
1/4C. Sugar
3T. Light corn syrup
1/2t. Vanilla extract

For the topping:
2C. Sugar
1/2C. Water
1 1/2T. Light corn syrup
2/3C. Heavy cream
2T. Unsalted butter, at room temperature
1C. Honey roasted peanuts

DIRECTIONS
Center a rack in the oven and preheat the oven to 350° F.  Butter an 8-inch springform pan, dust the inside with flour, tap out the excess and line the bottom of the pan with a piece of parchment paper.  Place the springform pan on a baking sheet.

To make the cake, combine the flour, baking soda and salt in a small bowl; whisk together and set aside.

Add the butter and chocolate to a microwave safe bowl and heat in 30 second intervals, stirring in between, until melted.

In a large mixing bowl, whisk together the eggs and sugars until well blended.  Whisk in the corn syrup, followed by the vanilla.  Add in the melted butter and chocolate mixture, and whisk until combined.  Gently whisk in the dry ingredients, mixing only until they are just incorporated.  The batter should be thick, smooth and shiny.  Pour the batter into the prepared pan and jiggle the pan a bit to even out the batter.

Bake for 40-45 minutes or until a thin knife inserted in the center comes out almost clean.  Transfer the pan to a rack and cool for 15 minutes, then run a thin knife between the cake and the pan and carefully remove the sides of the springform.  The cake may have puffed up during baking, but don’t be concerned if it develops a crater in the center while cooling.  Allow to cool to room temperature.  When the cake is totally cool, invert it, remove the base of the pan and peel off the parchment paper.  Turn the cake right side up onto a serving platter.

To make the topping, combine the sugar, water and corn syrup in a medium heavy-bottomed saucepan, stirring just to combine the ingredients.  Place the pan over medium-high heat.  Heat, without stirring, until the caramel turns deep amber, 5 to 10 minutes depending on the size of your saucepan and the intensity of the heat (mine actually took closer to 15 minutes).

Lower the heat a bit and, standing back from the saucepan, add the cream and butter.  When the spatters are less vehement, stir to calm down the caramel and dissolve any lumps.  Stir in the peanuts and pour mixture into a heatproof bowl.

You will have more caramel than you need, but you want to get all of the peanuts onto the cake, so spoon all of the peanuts out of the hot caramel and onto the top of the cake.   Pour or spoon enough caramel to cover all the nuts, drizzling a bit over the edges of the cake for presentation.  Allow the topping to set at room temperature, about 20 minutes, before serving.  Keep the leftover caramel at room temperature and save for another use.  (I used a 10″ springform pan – well, because that’s all I have – and had just enough caramel to cover).

Read Full Post »

This weekend my family got together to celebrate my Aunt and Uncle’s 25th wedding anniversary.  I was asked to make desserts for the party and decided that I wanted to highlight some fall flavors – mainly apple and cinnamon.

These cupcakes were very moist and the caramel frosting was the perfect topping.  Everyone loved them!

Cupcake recipe adapted from Two Frog Home.
Frosting recipe from Annie’s Eats.

INGREDIENTS
For the cupcakes
1C. Apple Pie filling, chopped lightly
2C. AP Flour
1 1/2t. Baking powder
1T. Ground cinnamon
1t. Ground nutmeg
2/3C. Unsalted butter
1C. Packed brown sugar
2 Eggs
1t. Vanilla
3/4C. Apple juice
Pinch of Kosher salt

For the frosting
16T. Unsalted butter, at room temperature
1lb. Confectioners’ sugar
1 1/2t. Vanilla extract
1/3C. Caramel sauce
Pinch of Kosher salt
2T. Heavy cream

For the caramel sauce
8T. Unsalted butter, cut into pieces
1C. Sugar
1C. Heavy cream
1/4t. Vanilla extract
Pinch of Kosher salt

DIRECTIONS
To make the cupcakes
Preheat oven to 350 degrees.  Line muffin tin with papers or grease.  Sift dry ingredients together.  Cream butter and sugar until light.  Add eggs one at a time, add vanilla.  Alternate the flour and apple juice into the creamed mixture until well combined.  Fold in the pie filling.  Fill muffin tin wells 3/4 full and bake 18-22 minutes.  Let cool.

To make the caramel sauce
Melt the butter in a heavy-bottomed saucepan over medium heat.  Add the sugar and cook, stirring occasionally, until the sugar begins to foam a bit.  It will look and smell like it’s on the verge of burning.  Remove from the heat and add the heavy cream.  Stir until the sauce is smooth, then mix in the vanilla and salt.  Let cool.  (This can be stored in the refrigerator for up to 2 weeks.)

To make the frosting
Add the butter to the bowl of an electric mixer.  Beat on medium-high speed 1 minute until smooth.  Blend in the confectioners’ sugar until smooth, 1-2 minutes.  Mix in the vanilla, caramel sauce and salt until incorporated.  (Note: the caramel sauce should be just warm enough that it is workable, but not warm enough to melt the butter in the frosting.)  Add the heavy cream and whip on high speed until light and fluffy, about 3-4 minutes.

Husband Rating – 5 out of 5 – “Delicious!  Actually, thanks for reminding me that there are some leftover in the kitchen, I’m going to go have one right now!

Read Full Post »

Candied Nuts

A few weeks ago, in class, we made candied nuts of all different kinds.  I brought them home and Christopher devoured just about every one.  This week he asked that I make more, and I was happy to oblige.

The cashews are his favorite, so I made this batch all cashews, but you could easily do it with any kind of nut or even mixed nuts.  These would also make great holiday gifts!


INGREDIENTS

2.5C. Nuts of your choice
1 Large egg white
1t. Ground cinnamon
1/4t. Ground nutmeg
1/4C. Sugar
1/2t. Salt (if the nuts aren’t already salted)

DIRECTIONS
Preheat oven to 325 degrees.

In a large bowl, combine nuts and egg white.

In a small bowl, combine cinnamon, nutmeg, sugar and salt.

Combine the two bowls and spread out on a baking sheet lined with foil or parchment paper.

Bake 20-25 minutes.  Remove from oven and move parchment paper to a wire rack to cool.  Separate any big clumps of nuts when cool and enjoy!

Husband Rating – 5 out of 5 – **crunch, crunch** “yum” **crunch, crunch** “so good!”

Read Full Post »

Older Posts »